In the WordPress website, it loads the entire contact form when the validator reloads the entire page by pressing the ‘Send’ button. There is no issue with it, but it makes the website heavier and slower.
In 2025, we expect a lightweight, faster, and smoother WordPress website experience.
Table of Contents
The good news is that you don’t need WPForms, Contact Form 7, or any plugin to get that modern, no-reload functionality.
With the help of just a few lines of PHP and JavaScript, you can create a fully working AJAX contact form. It not only validates inputs but also prevents spam and shoots messages instantly. Believe me, all these things are possible Without Plugins.
Let’s build it.
What You Will Learn in WordPress Contact Form Validator
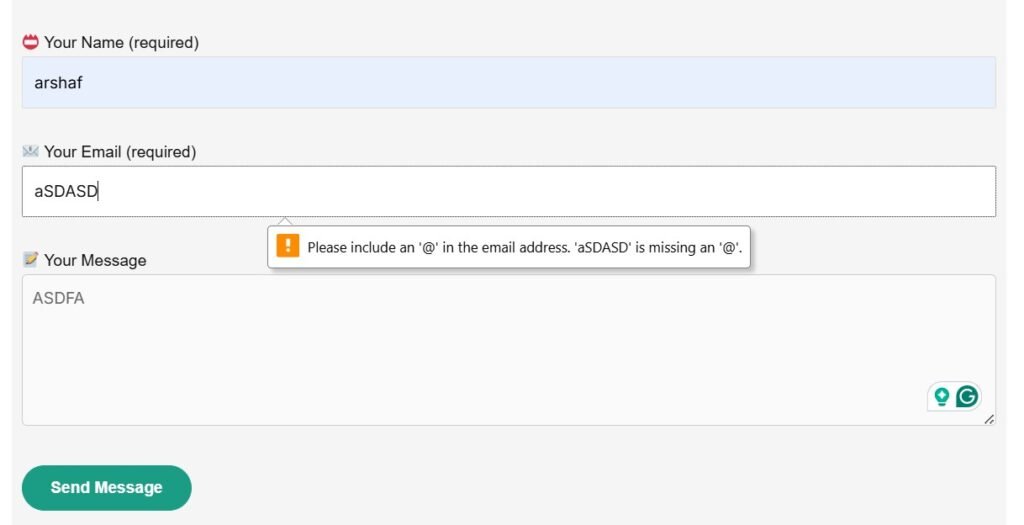
By the end of this tutorial, you’ll have a contact form that has the following features.
- Works with AJAX, no page reloads
- Validates user inputs (name, email, message)
- It blocks spam with a honeypot field.
- Shows instant success/error messages
- Links to your SMTP setup guide if email sending fails
All these steps will be completed inside your functions.php file. The code makes the site lightweight, faster, and 100% under control.
Step 1: Create the Contact Form Shortcode
Let’s start by adding the form HTML inside a shortcode, so you can place it anywhere on your site using [wop_contact_form].
Add this code to your theme’s functions.php:
// Display AJAX contact form via shortcode
function wop_custom_contact_form() {
    ob_start(); ?>
    <form id="wop-contact-form" class="wop-contact-form">
        <?php wp_nonce_field( 'wop_cf_submit', 'wop_cf_nonce' ); ?>

        <p>
            📛 Your Name (required)<br>
            <input type="text" name="cf-name" required>
        </p>

        <p>
            📧 Your Email (required)<br>
            <input type="email" name="cf-email" required>
        </p>

        <p>
            📝 Your Message<br>
            <textarea name="cf-message" rows="5" required></textarea>
        </p>

        <!-- Honeypot (hidden field for spam bots) -->
        <p style="display:none;">
            <input type="text" name="cf-robot" value="">
        </p>

        <p>
            <button type="submit">Send Message</button>
        </p>

        <div id="wop-form-response"></div>
    </form>
    <?php
    return ob_get_clean();
}
add_shortcode( 'wop_contact_form', 'wop_custom_contact_form' );
Now you can add [wop_contact_form] to any page — for example, your Contact Us page.

Step 2: Add the AJAX Script (No Page Reload) on WordPress Contact Form Validator
The next step is to add a small JavaScript snippet that catches the form submission and sends it to WordPress asynchronously via admin-ajax.php.
Still inside functions.php, add this:
// Enqueue inline AJAX script
function wop_cf_enqueue_scripts() {
    wp_enqueue_script( 'jquery' );
    ?>
    <script type="text/javascript">
    jQuery(document).ready(function($){
        $('#wop-contact-form').on('submit', function(e){
            e.preventDefault();

            var form = $(this);
            var response = $('#wop-form-response');
            response.html('<p>⏳ Sending message...</p>');

            $.ajax({
                url: '<?php echo admin_url('admin-ajax.php'); ?>',
                type: 'POST',
                data: form.serialize() + '&action=wop_send_message',
                success: function(res){
                    if(res.success){
                        response.html('<p style="color:green;">✅ ' + res.data + '</p>');
                        form.trigger('reset');
                    } else {
                        response.html('<p style="color:red;">❌ ' + res.data + '</p>');
                    }
                },
                error: function(){
                    response.html('<p style="color:red;">❌ Something went wrong. Please try again.</p>');
                }
            });
        });
    });
    </script>
    <?php
}
add_action( 'wp_footer', 'wop_cf_enqueue_scripts' );
How It Works
- The form doesn’t reload on submit (
e.preventDefault()stops it). - jQuery sends all form data to WordPress using AJAX.
- The backend (
wop_send_message) processes it and returns a JSON response. - Success or error messages appear instantly inside the form.
Step 3: Contact Form Validator Validate and Send the Message in PHP
Now let’s create the PHP handler that validates input, sends the email, and returns a JSON response.
Paste this code below your previous snippet:
// Handle AJAX form submission securely
function wop_send_message() {

    // Honeypot protection (bots fill hidden fields)
    if ( ! empty( $_POST['cf-robot'] ) ) {
        wp_send_json_error( 'Bot detected. Submission blocked.' );
    }

    // Nonce verification for CSRF protection
    if ( empty( $_POST['wop_cf_nonce'] ) || ! wp_verify_nonce( $_POST['wop_cf_nonce'], 'wop_cf_submit' ) ) {
        wp_send_json_error( 'Security check failed. Refresh and try again.' );
    }

    // Sanitize input data
    $name    = sanitize_text_field( $_POST['cf-name'] ?? '' );
    $email   = sanitize_email( $_POST['cf-email'] ?? '' );
    $message = sanitize_textarea_field( $_POST['cf-message'] ?? '' );

    // Validation
    if ( empty( $name ) ) {
        wp_send_json_error( 'Name is required.' );
    }
    if ( empty( $email ) || ! is_email( $email ) ) {
        wp_send_json_error( 'Please enter a valid email address.' );
    }
    if ( empty( $message ) || strlen( $message ) < 5 ) {
        wp_send_json_error( 'Message must be at least 5 characters long.' );
    }

    // Prevent header injection
    if ( preg_match( '/[\r\n]/', $name ) || preg_match( '/[\r\n]/', $email ) ) {
        wp_send_json_error( 'Invalid characters detected in input.' );
    }

    // Prepare and send email
    $to       = get_option( 'admin_email' );
    $subject  = "New message from $name";
    $domain   = preg_replace( '/^www\./', '', $_SERVER['SERVER_NAME'] );
    $headers  = array(
        'From: No Reply <no-reply@' . $domain . '>',
        'Reply-To: ' . $email,
    );

    $body  = "You have a new message from your website:\n\n";
    $body .= "Name: $name\nEmail: $email\n\nMessage:\n$message";

    $sent = wp_mail( $to, $subject, $body, $headers );

    if ( $sent ) {
        wp_send_json_success( 'Your message has been sent successfully!' );
    } else {
        // SMTP fallback help link
        $smtp_url = esc_url( home_url( '/configure-smtp-without-plugin' ) );
        wp_send_json_error( 'Message failed to send. If you see SMTP errors, follow our <a href="' . $smtp_url . '" target="_blank" rel="noopener">SMTP setup guide</a>.' );
    }
}
add_action( 'wp_ajax_wop_send_message', 'wop_send_message' );
add_action( 'wp_ajax_nopriv_wop_send_message', 'wop_send_message' );
What Happens Here
- The form data is received by WordPress’s built-in
admin-ajax.php. - Each field is sanitized and validated.
- If any field is invalid,
wp_send_json_error()returns an error message instantly. - If validation passes,
wp_mail()sends the email to your admin email address. - If sending fails (common on some shared hosts), the user sees a link to your SMTP configuration guide.
Step 4: How to Modify the Contact Form Validator
You have full control over the validation rules.
Here are a few examples:
Require Longer Name
if ( strlen( $name ) < 3 ) {
    wp_send_json_error( 'Name must be at least 3 characters long.' );
}
Make Message Optional
Just remove or comment out this line:
if ( empty( $message ) || strlen( $message ) < 5 ) {
    wp_send_json_error( 'Message must be at least 5 characters long.' );
}
Restrict Email Domain
if ( preg_match( '/@(gmail|yahoo|hotmail)\.com$/', $email ) ) {
    wp_send_json_error( 'Please use your company email address.' );
}
Every wp_send_json_error() or wp_send_json_success() message automatically appears inside the form without reloading.
Step 5: Add Basic Styling of Contact Form Validator
Add this CSS to your theme’s stylesheet:
.wop-contact-form input,
.wop-contact-form textarea {
  width: 100%;
  padding: 10px;
  margin-bottom: 10px;
  border: 1px solid #ccc;
  border-radius: 6px;
}

.wop-contact-form button {
  background: #0073aa;
  color: #fff;
  padding: 10px 16px;
  border: none;
  border-radius: 6px;
  cursor: pointer;
}

.wop-contact-form button:hover {
  background: #005f8d;
}

#wop-form-response {
  margin-top: 10px;
  font-weight: 500;
}
Troubleshooting – SMTP / Email Delivery
Sometimes, it happens that the contact form will appear to work, but the email never reaches. It indicates that the hosting server isn’t configured to send PHP mail correctly.
There is no need to worry. We can fix this easily.
Follow my full guide on how to configure SMTP in WordPress without a plugin to make sure your form delivers every message reliably.
Read the SMTP Configuration Guide
(Replace the link above with your real URL.)
Conclusion
You have now built a modern, lightweight AJAX contact form in WordPress, without using any plugin.
It validates input, blocks bots, sends email, and shows results instantly, all using built-in WordPress functions.
This setup keeps your site fast, secure, and under your full control. It is exactly what withoutplugin.com is about.
Please share your queries and suggestions in the comment section. We go through all comments and respond to them.
Thank You.